Installation
Close your Avid if it is open.
Windows
Files are in self-extracting ZIP format to speed up the downloading process. Simply double click on the .exe file and it will ask what folder you what to put them in, typically the AVX2_Plugins folder.
Macintosh
Double-clicking on the installer will be automatically install the MovingPicture plug in into its proper location, typically the AVX2_Plugins folder. If that has changed, you have changed it, navigate the file selector to the appropriate place.
Both
Restart the Avid program.
Opening Avid's Effects Palette should show the "StageTools" category in the left column and "MovingPicture" in the right.
If you are unable to select the MovingPicture effect, make the effect Palette larger, since it is often the last entry in the list.
FAQs
About MovingPicture
What can MovingPicture do that After Effects can't?
Why is it better than the internal DVE in my editor?
What's the difference between the Plug-In and Producer versions?
Will MovingPicture run on Mac OS-9, OSX and Intel Macs?
Can I use the same version on multiple computers?
Can I use the same version on different editing systems?
Will it run in Pal or HighDef (HDTV)?
How can I Streamline my Avid Workflow
What do I do once I've downloaded it for Windows?
What do I do once I've downloaded it for Macintosh?
How do I get a registered version?
In What folder does the Plug-In go on Windows?
In What folder does the Plug-In go on Mac?
Is the software available on CD or printed documentation?
Does MovingPicture support multiple CPUs?
What shortcut keys are available?
How can I make the motion have no Slows?
Scanning and Images
What size should my images be?
At What DPI should I scan images?
What resolution scanner do I need?
What type of images can be used?
Troubleshooting
I get a "Can't find graphics files" message
The edges of my picture are jittery.
MovingPicture's Timeline length is too small.
MovingPicture doesn't load the image from my NLE's Timeline.
My moves have a "stuttering" look when rendered.
I'm seeing "banding" in my QuickTime DV movies.
When I set a position on a picture, it doesn't "stick".
About MovingPicture:
What can MovingPicture do that After Effects can't?
Nothing. It's just easier. After Effects is a very robust compositing tool that shines in complex imaging situations, but it is overkill for doing pans and zooms on stills. MovingPicture is faster and easier to use. The moves can be instantly changed as your show changes, without going outside your editor.
Why is it better than the internal DVE in my editor?
MovingPicture will do pans and zooms on hi-res images, up to 8,000 by 8,000 pixels, so the image will not break up as you zoom into it. The internal DVE will only zoom on video-size images. MovingPicture is fast and easy to use
What's the difference between the Plug-In and Producer versions?
The MovingPicture Producer functions as its own program and does not need an editor to run. Its operation is identical to the Plug-Ins, but can create digital movie files for import into any editor that can accept them. Producer will create QuickTime files and AVI files (Windows only).
The Producer is able to create movie files with multiple pictures, placing transitions between them. You can use any version of a MovingPicture plug-in or Producer on the same computer at no additional charge.
Will it run in PAL or HighDef (HDTV)?
Yes. The Plug-In gets the frame rate and size from its host editor. If the editor can run in PAL, (they all do) the Plug-In runs in PAL, or any other frame rate the host editor runs. Since we can handle images up to 8,000 pixels in size, it handles HDTV with ease.
How can I Streamline my Offline to Online using Avid?
Since MovingPicture works on all Avid editors, it is very common to offline a show on one system and online it on another. We have written a guide aimed at sharing some techniques editors have used to streamline their workflow. Click here: Streamlining the Avid Off/Online Workflow.
Is it resolution- independent?
Yes. MovingPicture responds to whatever resolution the host editor is set to, up to 8,000 by 8,000 pixels. It will also render as interlaced, single field, or progressive- as requested by your editor.
Can I use the same version on multiple computers?
No. You must purchase a separate license for each computer you want to run MovingPicture on. However, if you have different editing systems on the same computer, one licensed version can be used on each different editor at no additional cost. (see below).
Can I use the same version on different editing systems?
Yes. If you have different editing systems on the same computer, one licensed version can be used on each different editor at no additional cost. This makes it easy to use the Plug-in on some jobs, and the Producer on others, as makes sense. You will however need to load the version that matches each editor you want to use, but will only need to register one. All the others will register themselves automatically.
What do I do once I've downloaded it for Windows?
Windows files are in self-extracting compressed installer to speed up the downloading process. Simply double click on the .exe file and it will ask what folder you what to put them in. Close your editor, if it is open. Choose the proper place to extract them to (listed below) required by your editor. The Moving.chm help file should be copied into c:\ folder (the root) for all Windows-based editors.
What do I do once I've downloaded it for Macintosh?
Macintosh Files are in a ZIP format. Some browsers will automatically decompress the .zip file into a folder. If you do not see a new folder with the same name as the ZIP file you just downloaded simply double-click on it.
Inside the folder is the help file, called QuickStart.html, a readme file called ReadMe (in RTF or PlainText format) and the application itself, called MovingPicture. Move the resulting MovingPicture file into the proper folder required by your editor if you are using the plug-in version.
How do I get a registered version?
You will need to download the evaluation version from our Web site if you haven't already done so. The evaluation version can be magically transformed into the full version by obtaining a unlock key number, which is specific to the computer you plan to use the product on (based on your computer ID).
To find your computer ID, run MovingPicture. When the MovingPicture menu bar appears, click on the Register menu option (in the Help menu on Windows systems). A dialog box will bring up a message with your computer ID number is.
Click on the Purchase tab on the left menu circle on the Web site and include that number in the form, (or you can email the number later) and you will receive an unlock number by email. Copy that number into the space provided and the program will transform itself into a fully functional and registered program.
How do I find my computer ID?
To find your computer ID, run MovingPicture. When the menu bar appears and click on the Register menu option (in the Help menu on Windows systems). A dialog box will bring up a message saying what your computer ID number is.
Codecs for both Windows and Macintosh based Avids can be found here.
What folder does the Plug-In go on Mac?
Avid32 editors look in the AVX_Plug-Ins folder for plug-ins.
Avid64 editors look in the /Library/Application Support/Avid/AVX2_Plug-Ins folder for plug-ins.
MovingPicture Producer can be placed in any folder.
What folder does the Plug-In go on Windows?
Avid 32 bit editors look in the AVX_Plug-Ins folder for plug-ins.
Avid 64 bit editors look in the AVX2_Plug-Ins folder for plug-ins.
MovingPicture Producer can be placed in any folder.
Is the software available on CD & printed documentation?
The software is downloaded from the Web only. It is quite small (about 150KB). We do not ship CDs or printed documentation. There is online help under the Help menu option in Windows versions. The manual is also available on the Web site.
Does MovingPicture support multiple CPUs?
Yes. Each additional processor speeds rendering time dramatically for both Windows and Macintosh-based systems.
What is a Placeholder Clip?
A placeholder (a.k.a. the "dummy clip") clip is simply a place holder for the effect on the Timeline. Even though we load the image separately, the editor needs a clip to attach the effect. Almost anything can be used, such as still image, a small AVI file, etc...
If you use a still image, use a relatively small one, as some editors will have a problem with large images on their Timeline. Final Cut Pro and Premiere Pro will rescale the video to fit the placeholder, so make sure it matched the video resolution you are using (i.e. 720 by 486).
What shortcut keys are available?
[0] (zero) Plays from beginning of show
[space] or [p] Plays or stops playing
[j] , [k] and [l] Plays reverse, stops playing or plays forward
[-] Move back a frame
[+] Move ahead a frame
[home] Go to start of timeline
[end] Go to end of timeline
[up] Move the camera up 1 pixel
[tab] Moves you from key to key in the timeline
[Ctrl-<] Make timeline show more frames per gray block
[Ctrl->] Make timeline show fewer frames per gray block
[del] Delete the currently highlighted key
[down] Move the camera down 1 pixel
[left] Move the camera left 1 pixel
[right] Move the camera right 1 pixel
[PgUp] Expand the camera 1 pixel
[PgDn] Shrink the camera 1 pixel
[down] Move the camera down 1 pixel
[Ctrl-left] Align the camera to picture's left
[Ctrl-right] Align the camera to picture's right
[Ctrl-home] Align the camera to center of picture
[Ctrl-PgUp] Expand the camera to picture's height
[Ctrl-PgDn] Expand the camera to picture's width
[shift] Constrains horizontal or vertical when dragging camera
[Ctrl-S] Save show to disk
[Ctrl-O] Load show from disk
[Ctrl-E] Load a new picture
[Ctrl-N] Clear the current show
[Ctrl-K] Make a Movie file (Producer version only)
[Ctrl-T] Make a still Targa file of the current frame on timeline
[Ctrl-Q] Quit MovingPicture and return to editor
[Ctrl-C] Copy the highlighted key to the scratchpad
[Ctrl-X] Copy the highlighted key to the scratchpad and then delete it
[Ctrl-V] Copy the key in the scratchpad to the highlighted key
[Ctrl-Z] Undo the last action that modified a KeyFrame
[Ctrl-Y] Redo the last action via Undo
NOTE: Macintosh users should use the Apple Command key rather than the Control key.
How can I make the motion have no Slows?
The curves have some inherent slowing down as the move hits a key frame. Click the No Curves item in the Options menu (as well as the No Slows item) to make a totally linear move.
Troubleshooting
I get a message saying "Can't Find Graphics File"
MovingPicture stores a reference to the folder where it looks to load the hi-res image to render. If the picture's folder location has changed, or when onlining projects on one computer that were created on another, it is common not to be able to find the images, since they are referenced by links to folders that do not exist on the online, particularly when the offline in Mac and the online is Windows.
You can choose a folder that MovingPicture will look for when it can't find the image specified in the placeholder clip. Put the images in a folder accessible by the online system. Re-edit the moves on one of the clips to bring up MovingPicture. It will not be able to load the image and generate an error, so just ignore it. Click on the Alternate Picture Folder option in Options/Advanced Options menu item to set that folder by choosing one of the images within it. Choose the Exit without Saving option to quit MovingPicture. From that point on, all previously unfound images will be loaded from that folder.
Mac users: If images don't load, it is possible that the file name may be too long on some systems, so try shorting the number of characters in the file's name.
My Mac isn't on the net, only my Windows machine
The software is very small ( about 150KB). Download the Mac .sit file on the PC and copy it to a floppy disk. ( NOTE: If you are copying to the desktop, make sure you press the 'Option' key, so that the actual file, and not an alias is copied.)
MovingPicture's Timeline length is too small
MovingPicture gets the length of its Timeline from the length of the effect specified. If you used a still image, you need to make sure it covers some time period on the NLE's timeline. Some editors allow you to call the plug-in without attaching it to a clip, which will make a duration of 0.
The edges of my picture are jittery.
Since most moves stay within the bounds of the image, we do not filter the edges of the image to improve rendering time. If you need to zoom beyond the edge, put a 1% border on the picture using that option in the "Image Prep" dialog.
MovingPicture doesn't load the image from my NLE's Timeline
MovingPicture was designed to work with hi-res images. Most NLE's limit the resolution that is passed onto any plug in to the final output video resolution, which is too small for zooming into without breaking up. When the Plug-in loads, select the "Load Picture" option from the "File" menu and load a TIFF, GIF, PSD or BMP image from disk.
My moves have a "stuttering" look when rendered
Different editing systems and/or hardware differ in the order and/ or 'topness' (a.k.a. spatial ordering) in which the two fields are arranged within a full video frame.
If the breakup occurs only in the top or bottom half of the image when you have the multi-processing option on, see next item in this FAQ.
The easiest way to diagnose this is by creating a move whose motion that ends midway through the scene. If the motion stutters only in the portion of the scene that actually moves, try reversing the field order by clicking the "Flop Field Order" checkbox in the "Advanced Options" item of the "Render" menu..
If it stutters in both portions of the move, you will need to change the topness. Some older cards, such as the Pinnacle/Miro cards (i.e. DC/DV 1000) require this to be flopped., by clicking the "Flop Top Field" checkbox in the "Advanced Options" item of the "Render" menu.
Producer will not make Movie Files
Make sure you set the height and width exactly to what you editor needs (i.e. 720 by 480 or 720 by 486, etc.) Check the properties of an existing movie file to be sure. If the sizes aren't right, codecs (particularly DV and MPEG2) will not even create a movie file, or the NL editor may need to re-scale it on import, causing artifacts and time-consuming re-rendering.
Scanning and Images
What size should my images be?
MovingPicture will accept images up to 8,000 by 8,000 pixels in size. Most scanner software have an option to specify the image size by pixels. In general, 1,500 to 2,000 pixels is the best size to use for most shows, unless you are really zooming in very tight. As a rule of thumb, you want to have at least 400 pixels to preserve image quality. For example, you could safely zoom in to one-fifth of the picture by using a 2,000 pixel image. This is somewhat subjective though, as some images hold up better than others.
At what DPI should I scan images?
If your scanner only allows settings in Dots Per Inch (DPI), the resulting image size in pixels (a.k.a. dots) will be the size of the image in inches times the DPI. For example, an 8 by 10 inch photo scanned at 150 DPI would yield a 1,200 by 1,500 pixel image. That same image scanned at 1,200 DPI would yield a 9,600 by 12,000, which is larger than MovingPicture can handle.
Can I use CMYK images?
No. Images must use the RGB format, rather that the more print-oriented CMYK color format.
What resolution scanner do I need?
For most work, a 300 DPI scanner will work fine. Slides and other small objects require higher DPIs, 1200 DPI or better. Even $50 scanners will do a good job, but may be slower than more expensive models.
What type of images can be used?
The MovingPicture Plug-In will accept 16, 24, or 32 bit images in Windows BMP, Targa TGA, Photoshop PSD, uncompressed TIFF files, JPEG and PICT files (Macintosh only). The best formats are PSD or JPEG.
Tutorial
The screens for the various Avid Editors may differ (i.e. Windows, Mac, Symphony, Media Composer and XPress), but they all work look like the Windows DV shown below. This tutorial will show you how easy it is to make a simple move from the Avid timeline. Check out the QuickStart Guide for further details, and Streamlining the Avid Off/Online WorkFlow.
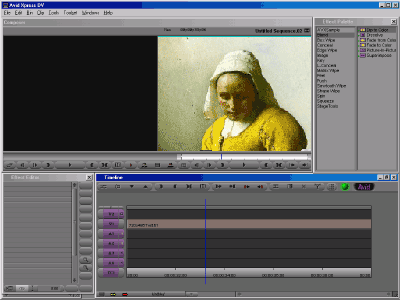
Open up Avid and place a clip on the timeline.
The clip should be as long as you want the move to be.
Highlight the clip by clicking on it.

Make sure the Effects palette is visible.
Scroll down the list until you come to one called "StageTools".
To the right, a list of plug-ins by StageTools will appear
Drag MovingPicture over your clip.
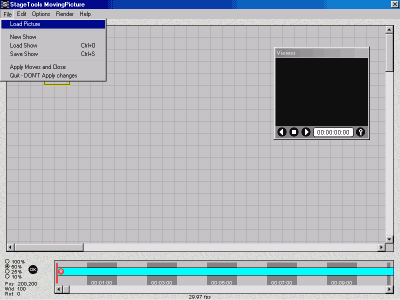
The MovingPicture screen will appear.
Click on the Load Picture item in the File menu.
Choose a picture to move.
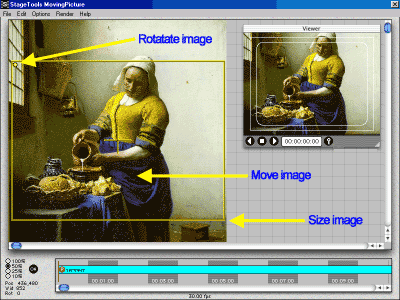
Drag yellow box to frame up start of move.
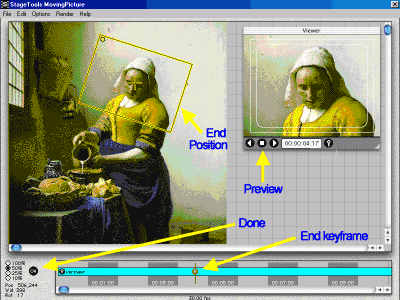
Choose time for end of move by clicking on Timeline.
Drag yellow box to frame up the end position of move.
Preview your move with the Viewer player buttons.
Click on the OK button to return to the Avid.
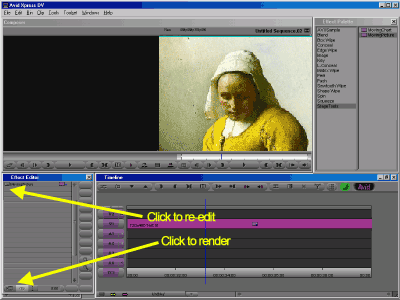
Click on the Render button to render the clip.
You can re-edit the moves by clicking on the button in the Effects Editor.